How to Hang a Picture Frame: A Simple Step-by-Step Guide
Hanging a picture frame might seem like a small task, but doing it properly can completely transform a room. Let Memory Lane Framing explain how to correctly hang your frame. Whether you’re displaying precious family memories, baby hand and feet castings, or a statement artwork, the right placement and technique make all the difference. This guide will walk you through how to hang a picture frame securely and beautifully—without the stress.
Why Properly Hanging a Frame Matters
A well-hung frame doesn’t just look good—it protects your piece from damage and ensures it stays level over time. Crooked or poorly secured frames can fall, causing unnecessary damage to both your wall and your treasured keepsakes.
What You’ll Need
Before you begin, gather the following tools:
- Measuring tape
- Pencil
- Hammer
- Drill and drill bit (according to material to be drilled)
- Screws
- Wall anchors (for plasterboard walls).
- Spirit level (explained later)
Step 1: Choose the Right Spot
Start by deciding where your frame will go. A good rule of thumb is to hang artwork so the centre sits about 145–150 cm from the floor—roughly at eye level. If you’re hanging above furniture, leave about 15–20 cm between the frame and the top of the furniture. However this is dependant on the look your trying to achieve. Simply hold the frame against the wall to find the best position.
External Factors
UV Light– When choosing your position its a good idea to think about external factors to the frame. Having your frame hung directly facing sunlight will cause the matting and photo/item to fade over time. Other items that can impact your frame can be LED lighting, particularly bright white LED. Although this is negligible, they can cause fading.
Heat – External heat sources can impact the frame materials. Hanging your frame on a wall that is always getting heated from the sun can transfer heat to the frame. This can impact the glued corner joints, tape and glues, frame finish due to constant heat expansion through out the day.
Air Conditioning – Evaporative air conditioning can effect the frame. Evaporative air conditioners use water to cool the air. This evaporated water can ‘leach’ into the materials in the frame causing warping. A good rule of thumb is to place the frame in a well ventilated spot to reduce absorption and dry out the frame when the AC is not in use. Reverse cycle AC will effect the frame similarly to the above heat paragraph.
Wind – Try to avoid placing the frame near window and door openings that catch the breeze. Although negligible, wind can cause your frame to move on the wall and possibly blow off.
Step 2: Measure and Mark
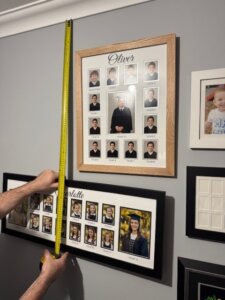
Measure the width of your frame and find the centre point. Then measure from the top of the frame down to the hanging hardware (wire or hook). Transfer this measurement to the wall and mark lightly with a pencil where your hook or screw will go.
For precise hanging of wire hardware, Use the tape measure as the hook and pull towards the top of the frame. This will ensure the frame is centered to the wire. When the line is taught take the measurement.

Step 3: Check Your Wall Type
Different walls need different fixings:
- Plasterboard (drywall): Use wall anchors for extra support
- Brick or concrete: Use masonry plugs and screws
- Timber studs: Screw directly into the stud for maximum strength (ideal for heavy frames).
Step 4: Install the Hook or Screw
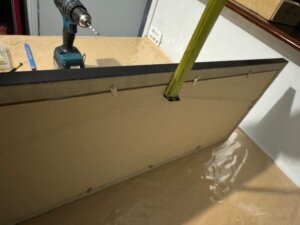
While holding the frame to the wall in your ideal position, measure from the top of the frame to the ceiling cornice (view pic below). Add the 2 measurements together and this will be the height that you drill the hole (i.e. 100mm (frame from cornice) PLUS 45mm taught wire measurement (wire to top of frame) equals 145mm from the cornice edge). Using a drill, install your hook or screw at the marked point.
Step 5: Hang and Level
Carefully hang your frame on the hook. Use a spirit level will ensure it’s straight. Adjust as needed until it sits perfectly. Another option is ‘eyeing’ it. Stand back and line the top of the frame with another horizontal surface lice the cornice.
Remember: when adjusting the frame to hang level, slide it on the wire. Don’t just push the corner of the frame up or down as it will eventually end up crooked again.
Step 6: Secure the Frame
To prevent the frame from shifting over time, consider adding adhesive picture strips or rubber bumpers to the bottom corners. This keeps it stable and protects your wall. Or alternatively add 2 hanging points.
Tips for a Professional Finish
- Create a gallery wall: Lay your frames out on the floor first to plan the arrangement
- Use templates: Trace your frames on paper and tape them to the wall before committing
- Consider lighting: Natural light enhances your display, but avoid direct sunlight to prevent fading
- Movement: Add 2 hanging points leaving approx. 150mm spacing. This helps stops movement
Common Mistakes to Avoid
- Hanging frames too high
- Not using the correct wall anchors
- Skipping the level (leading to crooked frames)
- Guessing measurements instead of marking properly
- Avoid using “sticky hooks“. They may be rated but will fail eventually
Final Thoughts
Hanging a picture frame doesn’t have to be complicated. With the right tools and a little planning, you can create a display that looks polished and lasts for years. Whether it’s a sentimental keepsake or a decorative piece, taking the time to hang it properly ensures it gets the attention it deserves. When you need to hang a picture frame in Adelaide, you know you are doing it right by following these simple steps.
If you would like to view our Personalised School Photo frames, check them out here
Want to see more of our products – Head over to our Shop Page
Have any questions? send us an email – Contact us